
How to Use CalTopo
Why is CalTopo useful?
Learning to use CalTopo is among the most valuable skills available for planning your next adventure. Mastering the basics of Caltopo’s interface not only allows you to embark on a journey well-informed but also allows you to leave folks back home with a comprehensive plan if you go missing. Thus, learning CalTopo will enable you to better plan and executes excursions while vastly increasing your margin of safety.
With dozens of valuable features, learning how to use CalTopo can appear to be a daunting task. Fear not; we’ve taken the time to consolidate its most valuable aspects into a quick and easy guide. The information on this page will help you build an understanding of CalTopo’s interface so you can get back to planning your trip and head outside!
CalTopo's features are extensive. This guide covers what is available to users with the free account and is essential to use the software efficiently. This guide is best viewed on a laptop or desktop.

A screenshot of CalTopo’s interface with a user-designed route and its corresponding elevation profile.
Contents
All of this information and much more is included in our 3-hour Trip Planning Class.
A Tour of CalTopo’s Interface
Head over to www.caltopo.com in a separate window where you’ll see CalTopo’s interface open to its default appearance pictured below. If you have created an account and used CalTopo before, it will open to your last-used map position and settings.
We highly recommend that you sign up or link an account to CalTopo as it allows you to save projects you create.
Hover over the image below with your mouse to identify several key features of the interface that this guide will cover first.
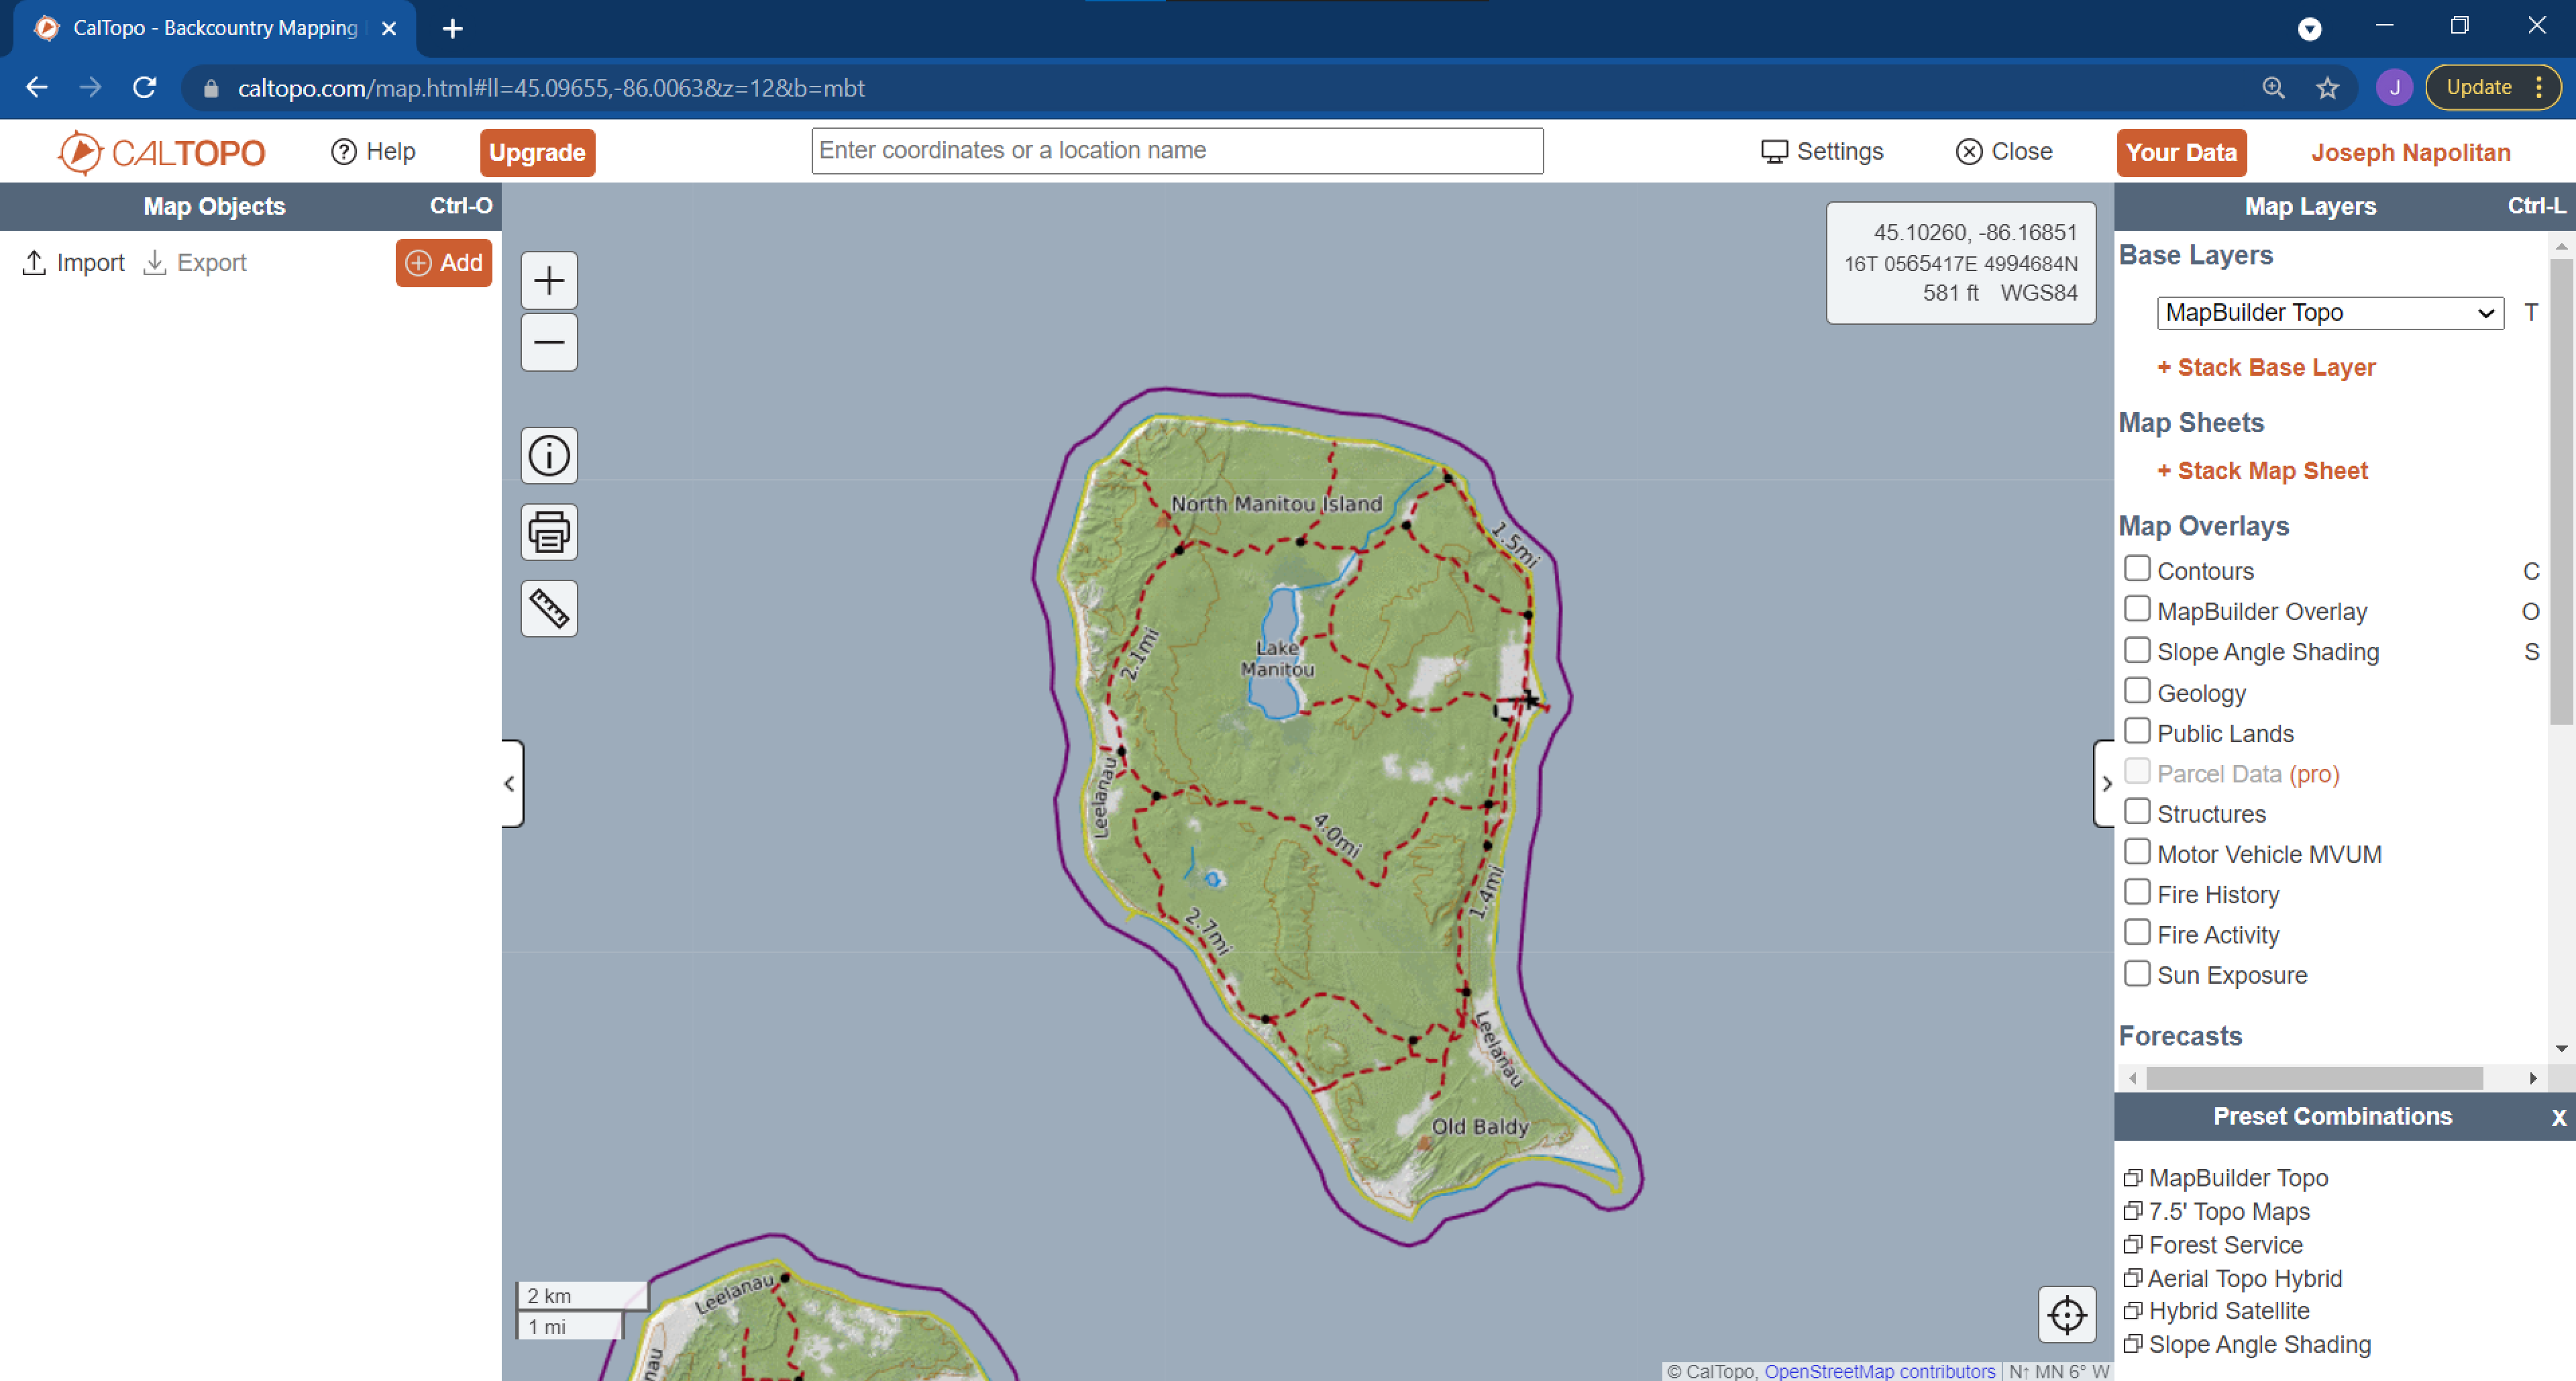
Scale
As with a standard topographic map (future link), CalTopo includes a scale that indicates the ratio of distance to the corresponding space on the map pictured. You will notice that this scale changes as you zoom in and out.
Position of Mouse on Map
As the title suggests, the small window in the upper right corner displays positional information depending on the mouse's location on the map. This information and the units displayed can be changed - how to do so is discussed below.
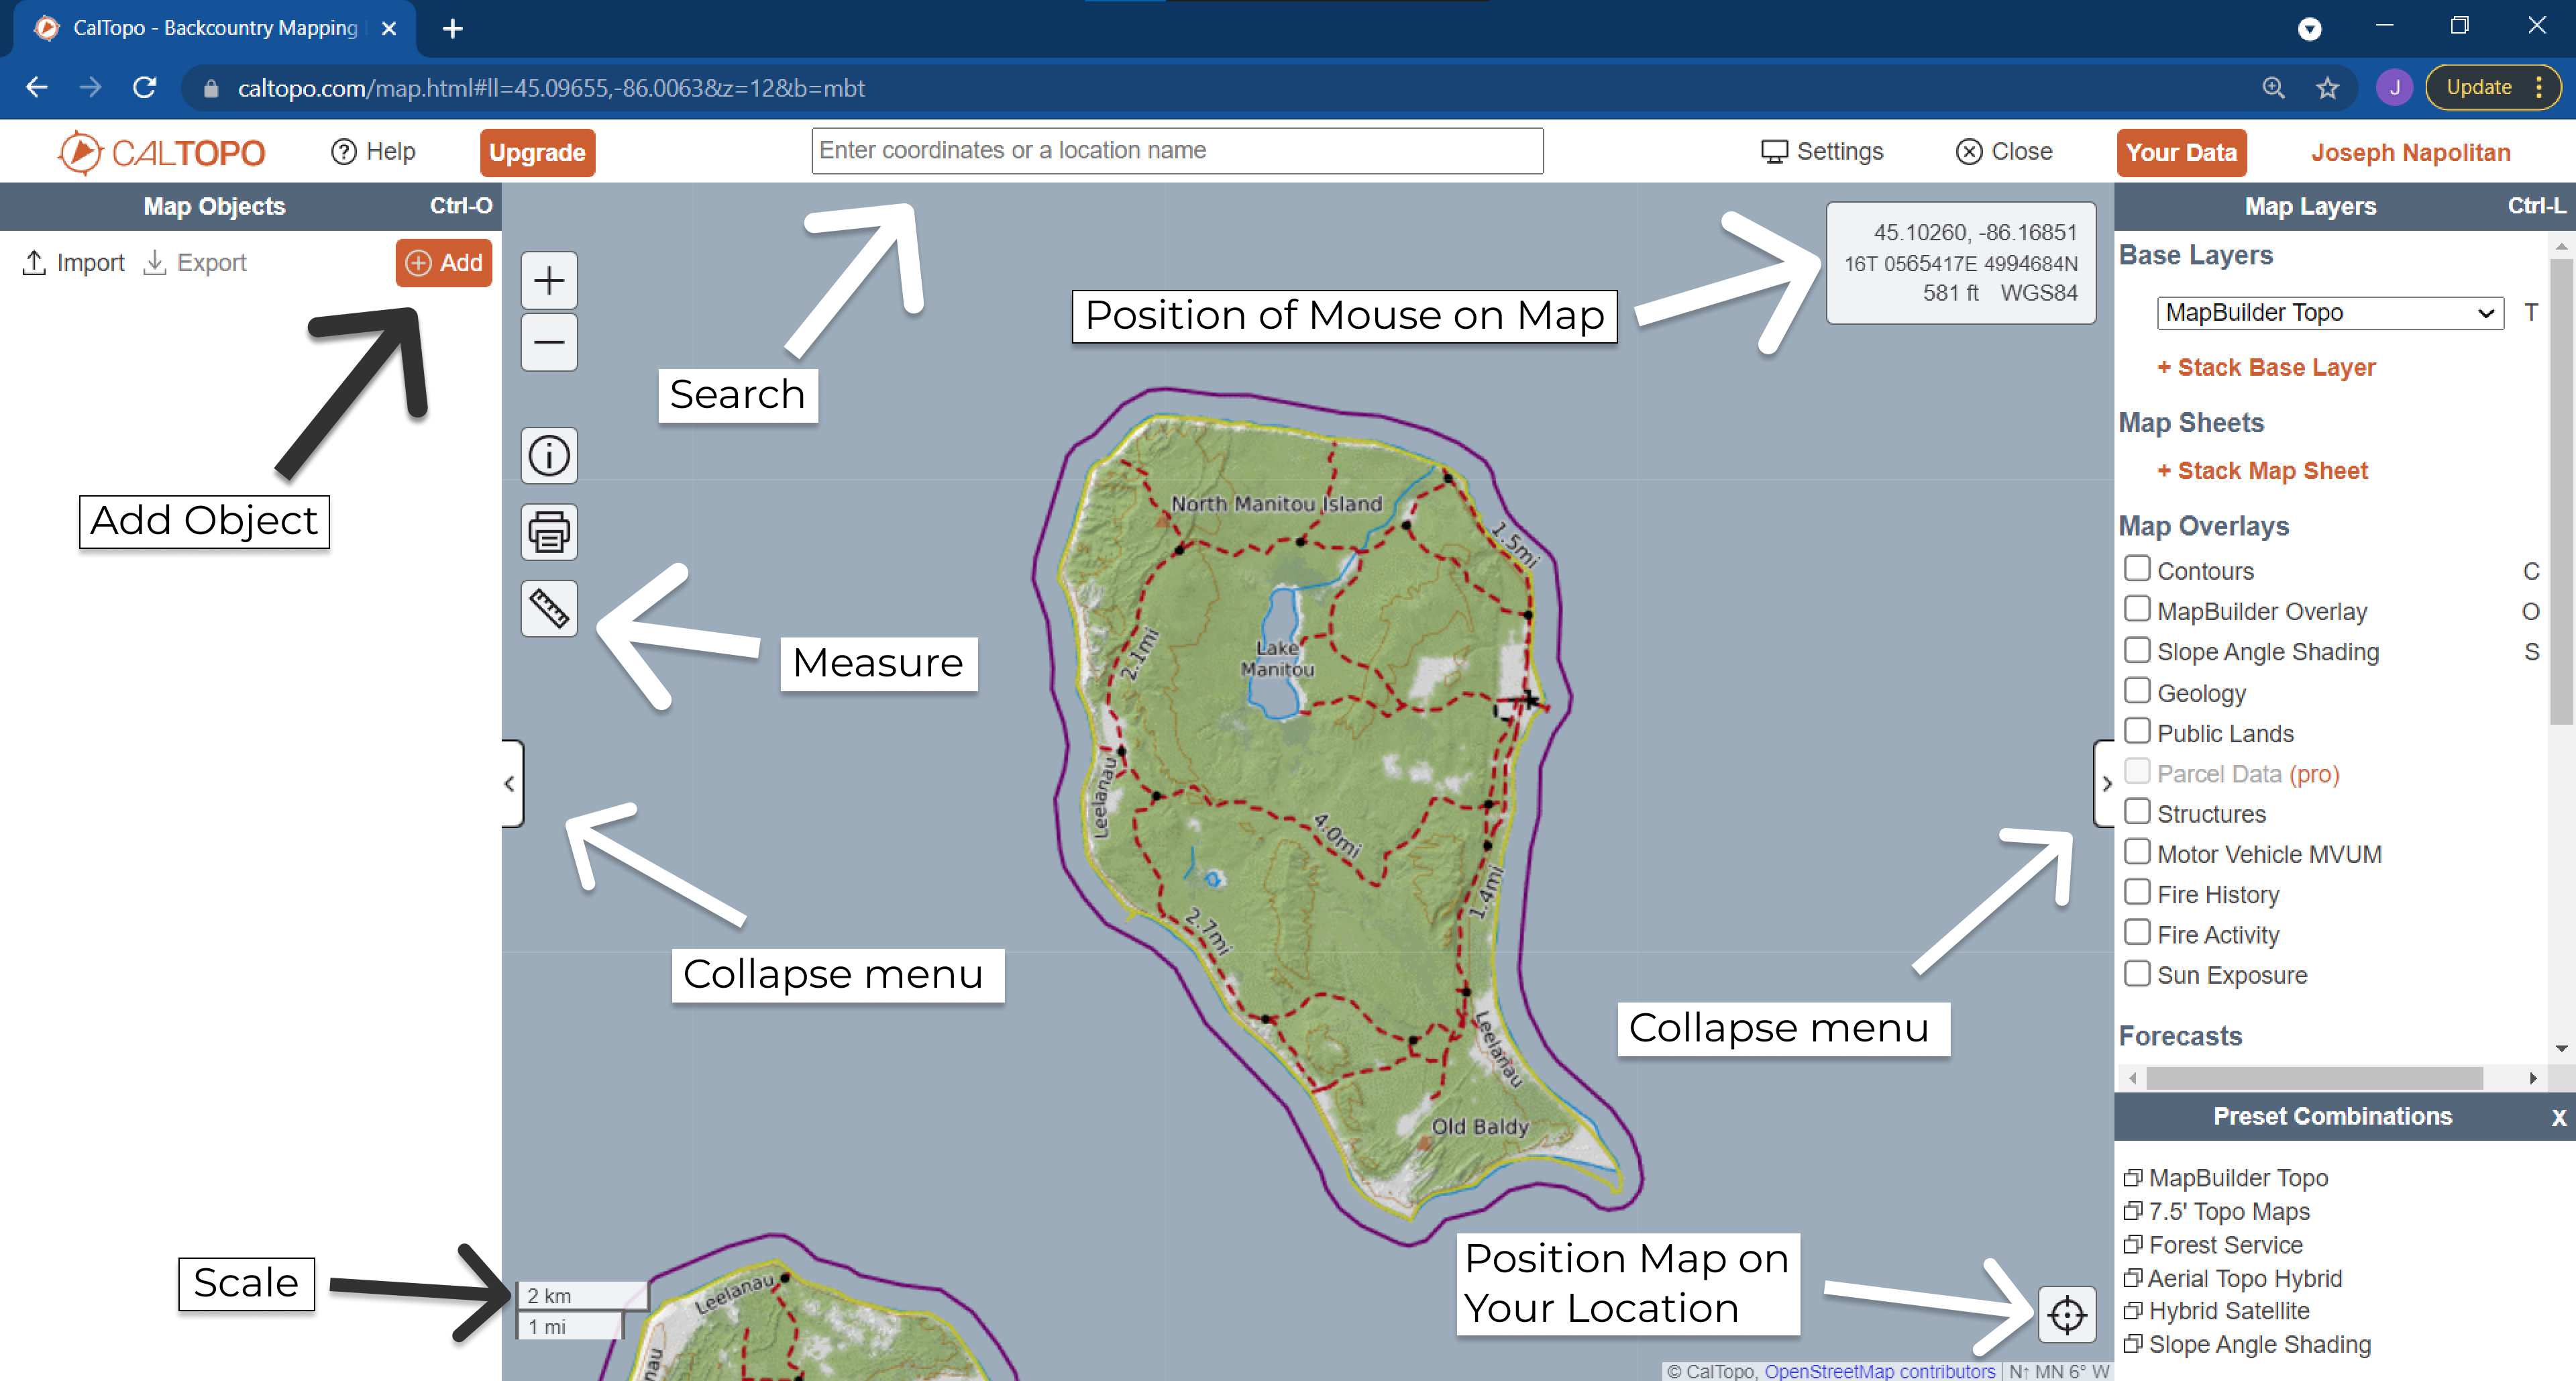
Changing Units and Other Settings
Before proceeding, click "Settings" directly above the positioning window. The menu pictured provides options to customize the interface.
Ensure that your measurement units are as desired. If you're accustomed to using U.S. units of measurement (inches, feet, miles, etc.), select the dropdown menu next to "units" and select "Imperial."
At the bottom of the menu, you will find the option to change the position displayed in the window. You can choose to display the location of where the map is centered rather than on the mouse.
There are additional options, including:
Placing a Universal Transverse Mercator (UTM) grid on the map, similar to that seen a standard USGS topographic map.
The option to update the URL when you move your map, allowing you to create a shareable link to the exact positioning of your map.
The option to change the coordinate units in the positioning window.
CalTopo's Measure Tool 📏
CalTopo's Measure Tool offers a quick way to acquire a variety of information with your map. Click the 📏 icon to see the dropdown menu in the picture. It's important to note that CalTopo's interface will not save this information for you. If you wish to keep the information, use the "+Add" tool.
Take a moment to familiarize yourself with their functions, the most important of which we explain below.
Position & Elevation
As the name suggests, clicking "Position & Elevation" will provide a popup window with positional information, including:
Coordinates
Elevation
Slope Angle
Slope Aspect

Clicking "NOAA Forecast" will open a separate web browser window with a weather forecast specific to the exact location selected. NOAA (weather.gov) point forecasts provide the most reliable weather forecasts for any given area.
Distance
CalTopo's Distance tool displays the length of a line drawn on the map. How to do this is described in detail below.
Bearing
CalTopo's Bearing tool provides you with a compass bearing between two points selected on the map. This tool is handy if you plan to travel off-trail along your route.

The window below the map displays the profile of the line drawn on the map. The black circle on the line corresponds to the position on the profile where the mouse is hovering.
Profile
CalTopo's Profile tool is similar to the Distance tool but offers more information about the line drawn, including:
A visual representation of the elevation profile of the line drawn. You can hover over a position on the profile to see its corresponding location on the map.
A range indicating the highest and lowest point of the route.
Total elevation gained and lost.
Click "expand" to open a more detailed view of your profile, as pictured below, and the option to save the profile as an image or PDF.

Note the colored bars beneath the profile that indicate the following at any given point on your profile: slope angle, land cover and tree cover.
Take a brief moment to try the NOAA Forecast and Profile tools before continuing on.

CalTopo’s Add Object Tool
Clicking “+Add” on the left creates the collapsible dropdown menu pictured. This menu offers many of the same options as the Measure tool, with additional features to customize your map. Most importantly, using the +Add tool allows you to save your work. You can use these tools to create detailed maps like the one pictured below.

A CalTopo Map with objects added to indicate routes and campsites day-by-day. Each line can be selected to observe route information, including a profile.
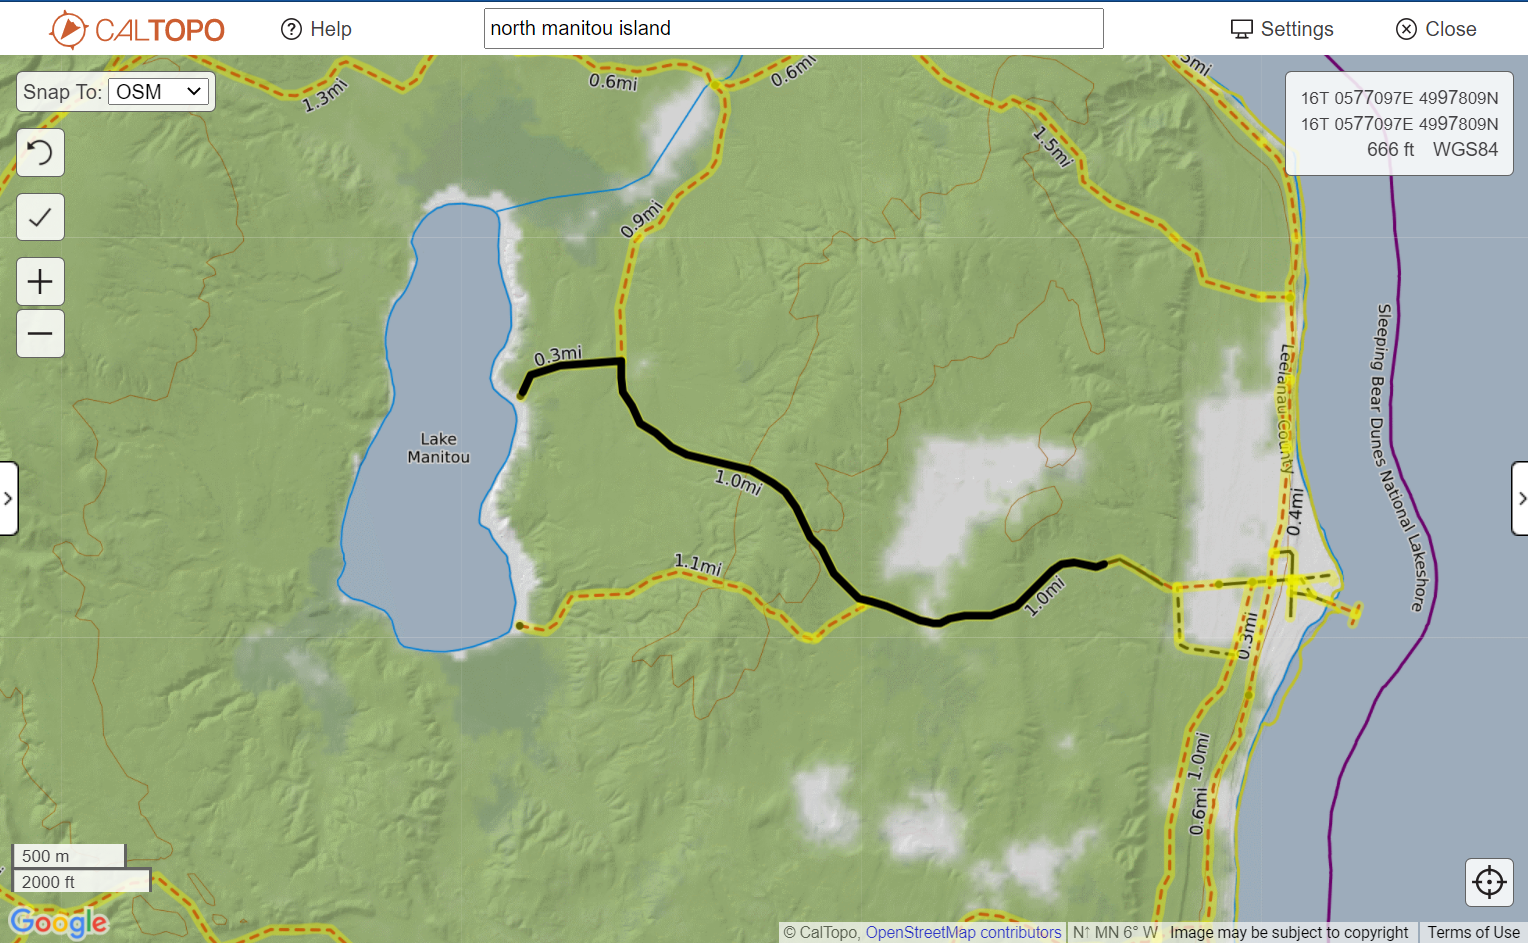
How to Draw a Route With CalTopo
To draw a route, use the “Measure: Distance/Profile” tool or the '“+Add: Line” tool. You’ll see a number of shaded yellow lines appear that follow roads and trails as seen in the picture. You can click on one of these lines to “snap” your route to it.
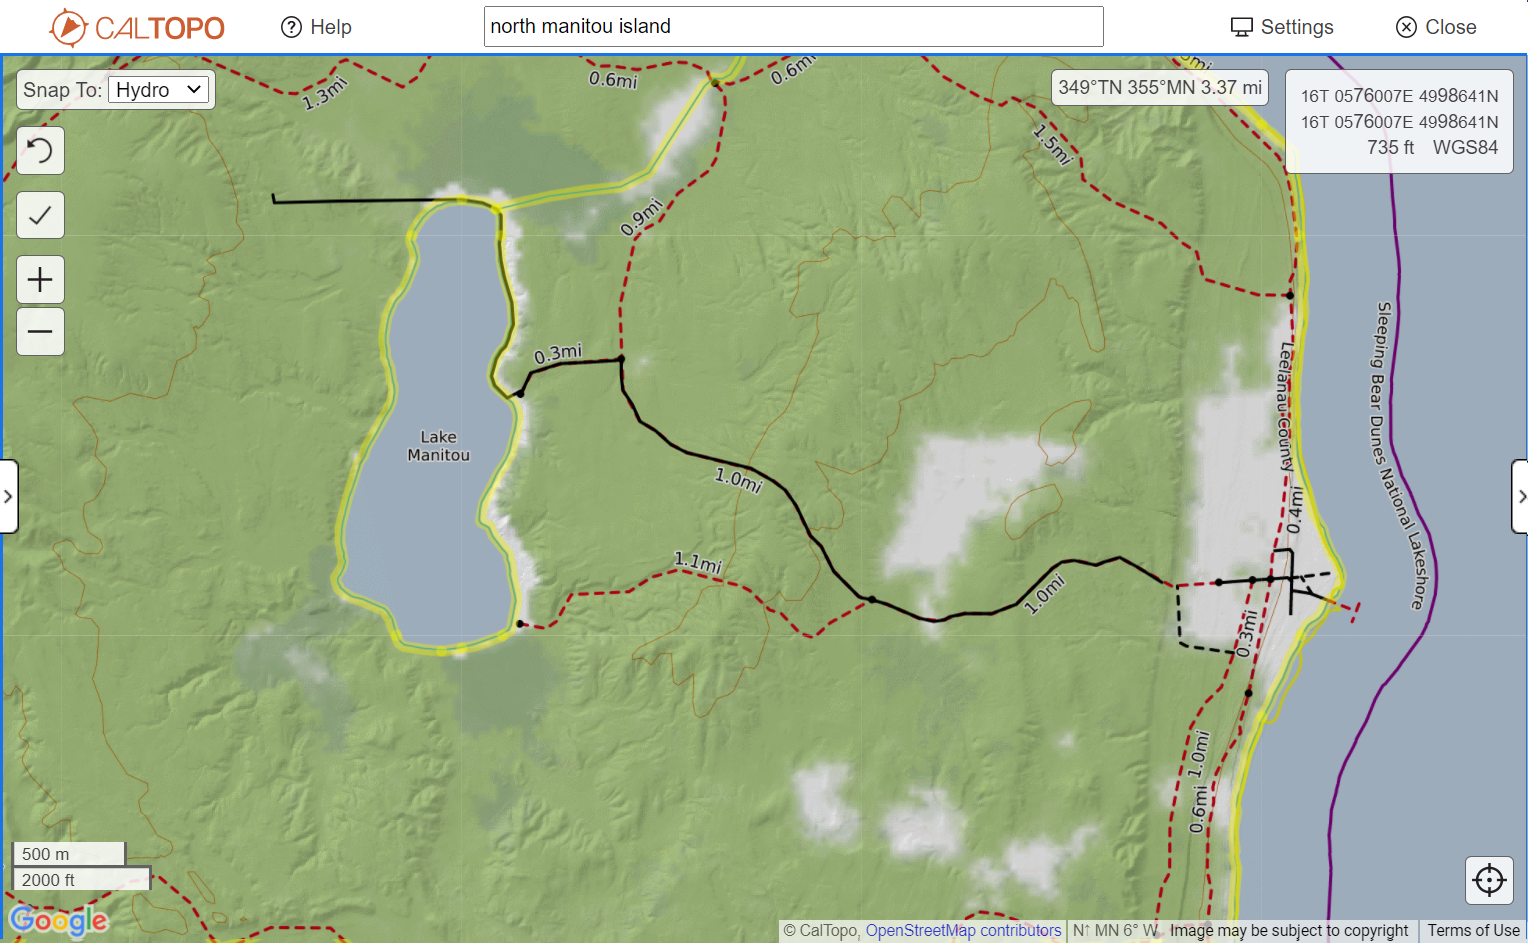
In the upper left corner of your display, you’ll see a “Snap To” dropdown menu. This allows you to move the pre-established yellow lines to different types of features. For example, hover your mouse over the image to see how selecting “Hydro” allows you to snap your route to waterways.
Click anywhere to add length to your route, and press “Esc” to undo an action. Double click to finish your route.
How to Use CalTopo’s Map Layers Feature to Change the Appearance of Your Map
Using only the tools above, you can gather a wealth of information for planning your next adventure and begin to create detailed maps for future reference. The next step in learning proficiency with CalTopo is building an understanding of its Map Layers feature.
In short, Caltopo’s Map Layer feature allows you to change the appearance of your map. This allows you to gather a more well-rounded understanding of terrain and make your final product more user friendly if you chose to print your map or export it as a file.
CalTopo Base Layers
The Caltopo Base Layer determines the appearance of the map on your screen. You’ll notice that there’s a dropdown menu with several map layer options. Below we’ve outlined some of the most commonly used layers.

MapBuilder Topo
CalTopo’s MapBuilder Topo layer is a simplified version of your standard USGS topographic map (link). This is an excellent place to start. It contains imagery for just about any location in a consolidated, easy-to-understand format.

Scanned Topos
CalTopo’s Scanned Topos layer will display a topographic map overlay identical to that seen on a standard USGS topographic map. This layer offers more detail than what is shown on the MapBuilder Topo layer and is recommended for more detailed trip planning.

Forest Service
CalTopo’s Forest Service layer, when available, offers information formatted by the United States Forest Service (USFS). Generally, it resembles the Scanned Topo layer but can include or exclude information depending on the location. For this reason, it can be helpful to examine both layers when considering travel in undeveloped areas.

Shaded Relief
CalTopo’s Shaded Relief layer displays a black and white image of an area with slope shading. The shading adds a “3D-like” appearance to the terrain, offering an easily understood visualization of a particular area. This layer is especially useful when stacked with other layers.
In addition to the base layers displayed above, several others are offered in the free version of CalTopo with many more in paid plans. Notably, Global Imagery is a layer that provides a map display that is essentially the equivalent of Google Maps’ satellite view. Also of note is OpenSteetMap, a layer that offers a more detailed version of Google Maps’ standard street map view.
Take a moment to select each of the layers to examine their features.
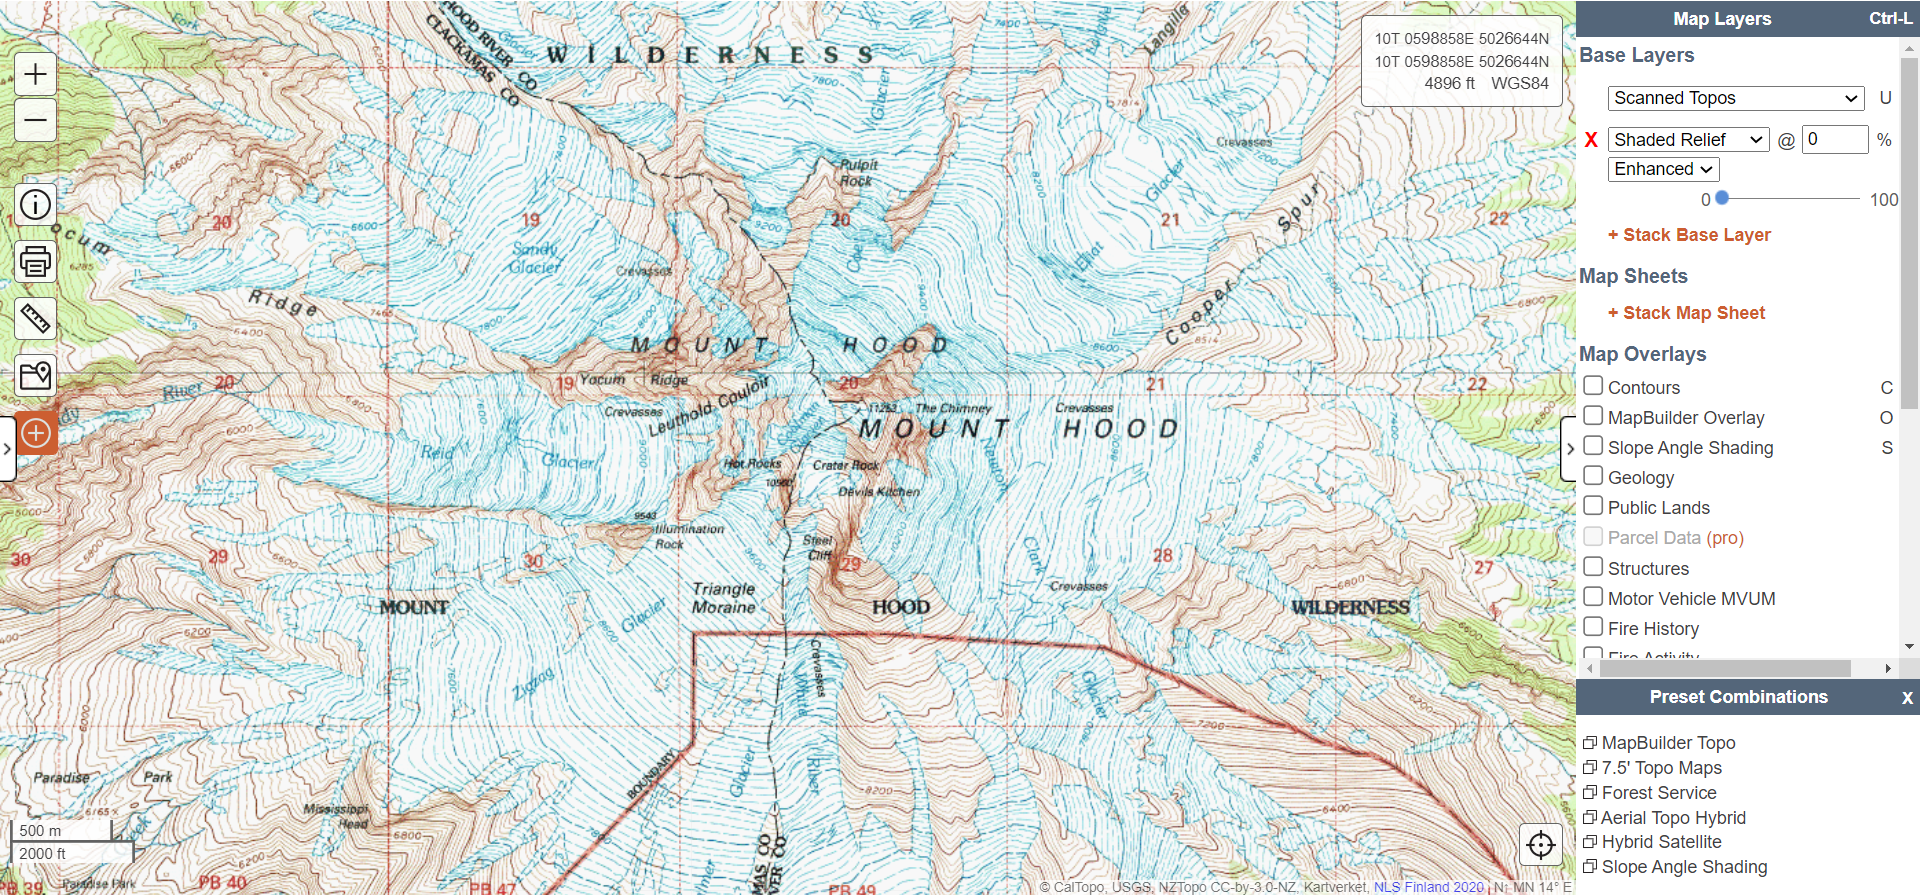
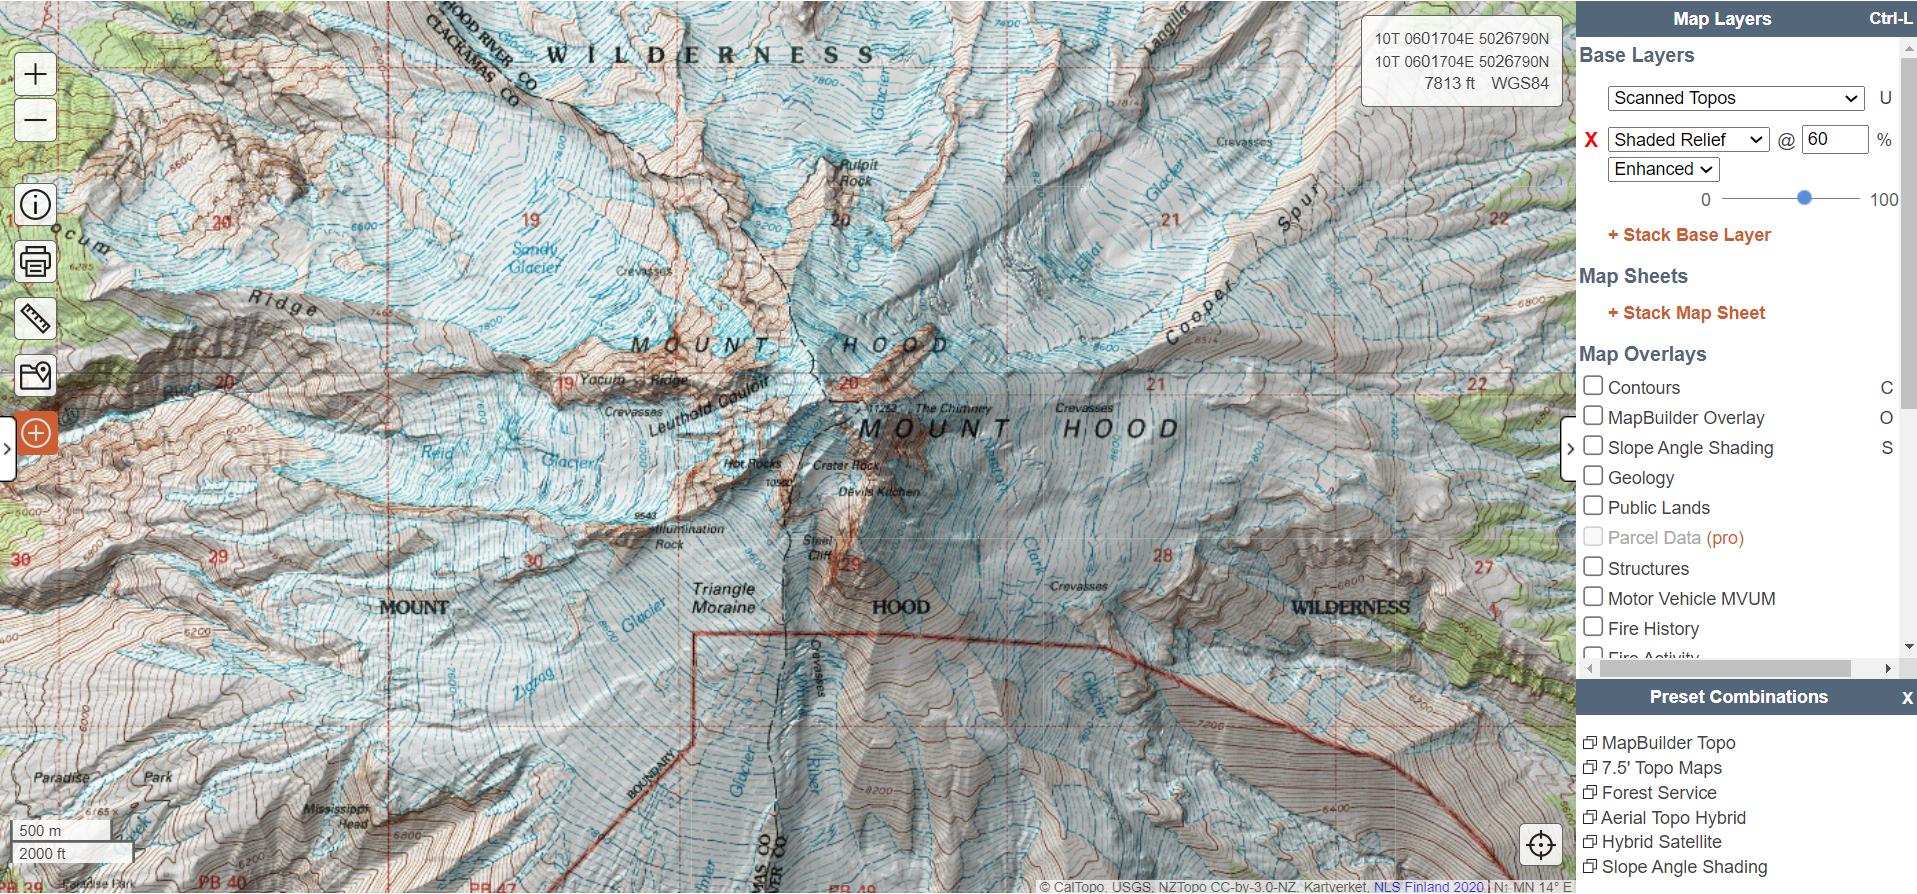
Stacking Base Layers With CalTopo
Beneath the option to select a base layer, you will see another option: + Stack Base Layer. In essence, this allows you to combine two map layers. This feature is handy when it comes to building a well-rounded understanding of the terrain you’re looking at.
The example pictured demonstrates this feature well. Hover your mouse over the image to see what a Scanned Topo layer of Mount Hood looks like when stacking the Shaded Relief layer with 60% opacity.
Caltopo Map Overlays
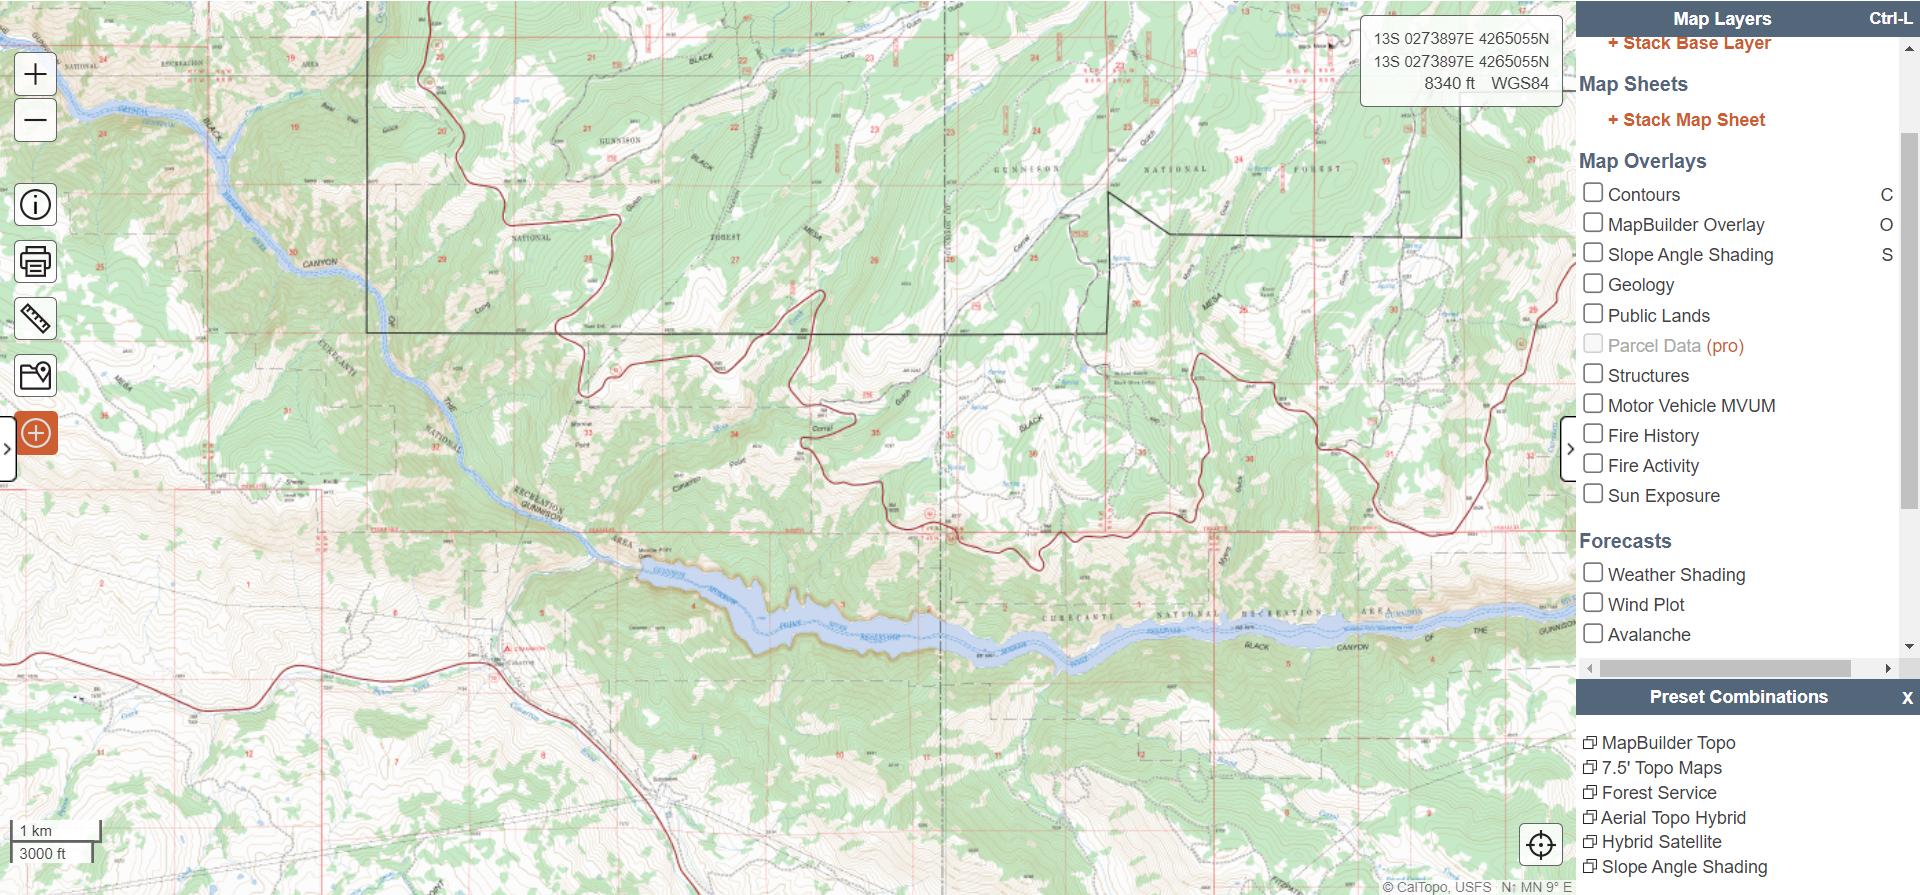
In addition to Base Layers, CalTopo’s Map Layers menu offers a list of options you can select to add additional features to your map. You can see the three we find most useful below by hovering over the Scanned Topo map of Black Canyon of the Gunnison with your mouse. Be sure to try each in your own interface to see for yourself what they offer.
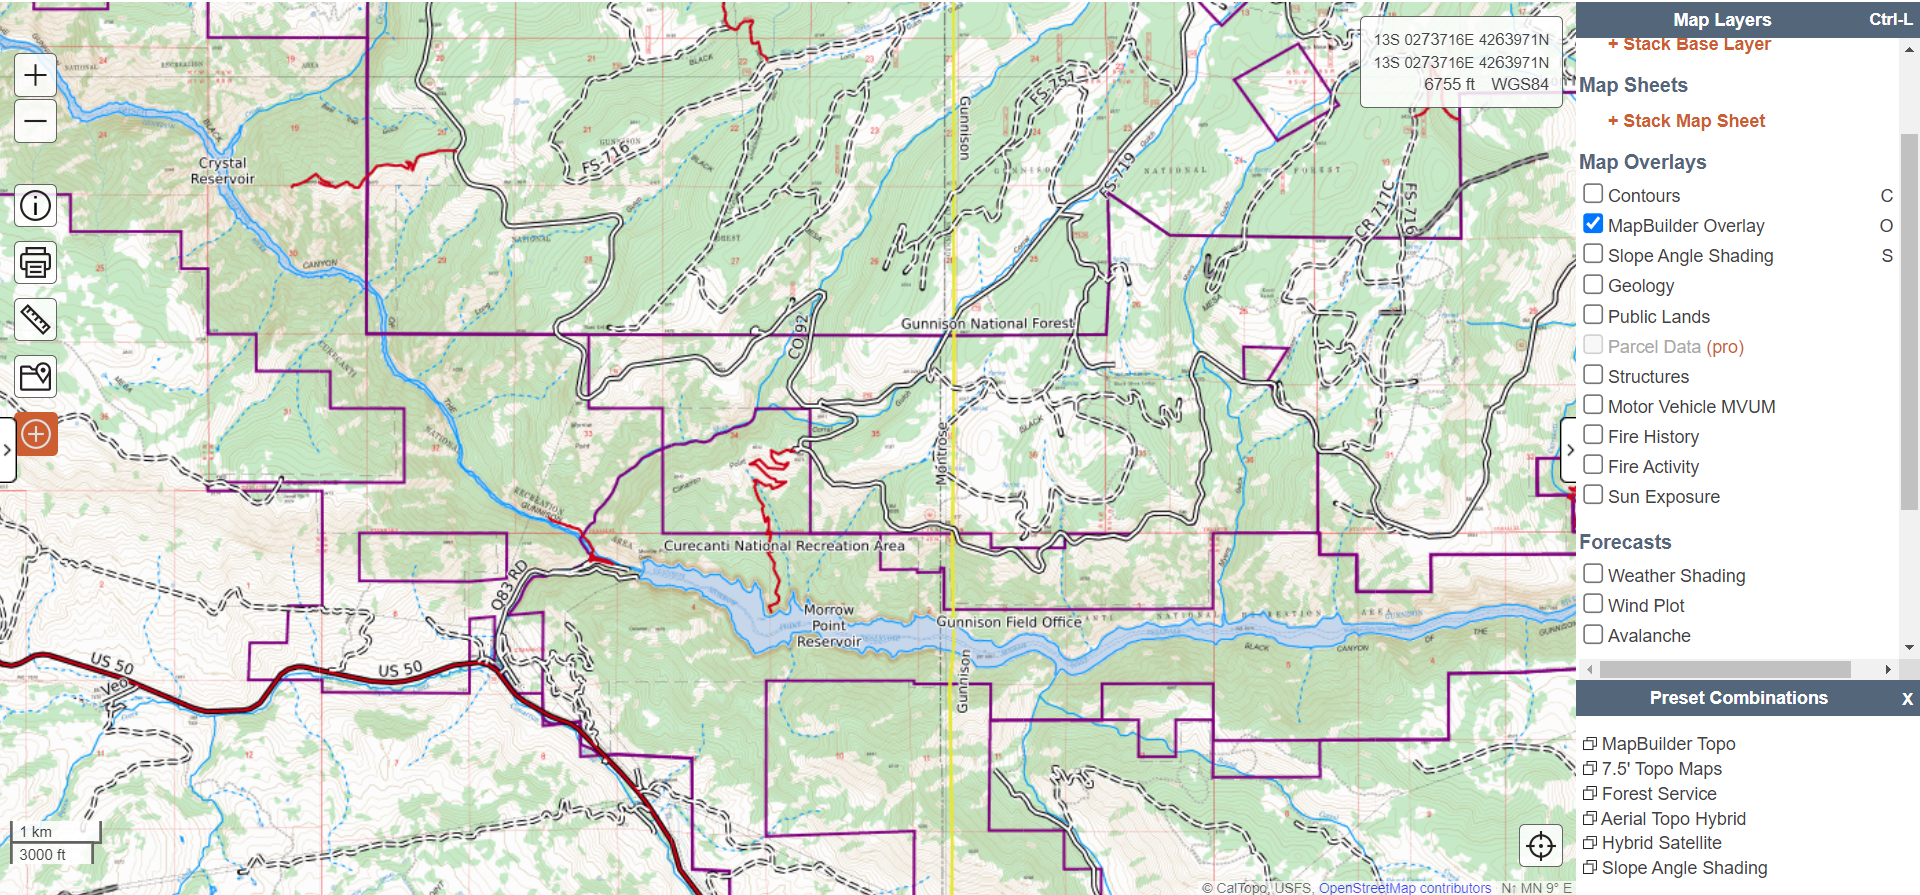
MapBuilder Overlay
Select this overlay to add the features of CalTopo’s MapBuilder Topo layer to any other map layer. This overlay is useful if you want to, for example, add the vividly outlined information of the MapBuilder Topo layer to the comprehensive detail of a Scanned Topo map.
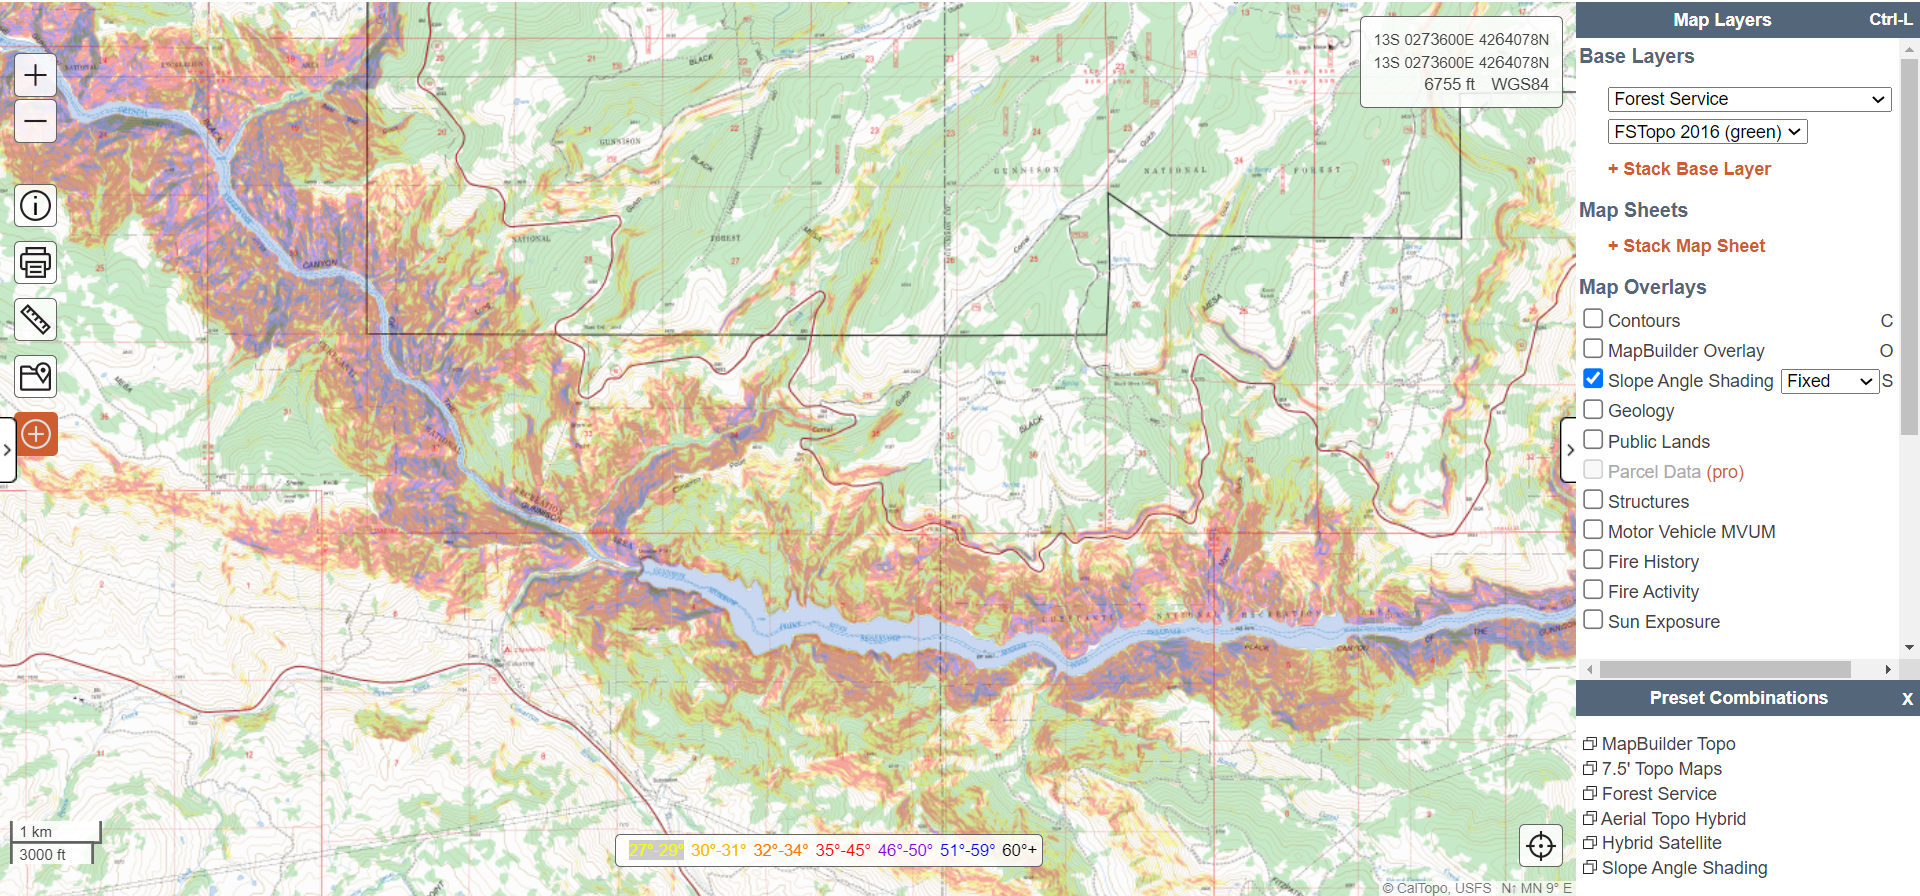
Slope Angle Shading
As the name suggests, this overlay adds color shading to slopes depending on their angle. This feature is handy for planning backcountry skiing routes as it essentially highlights any pitch susceptible to avalanches.
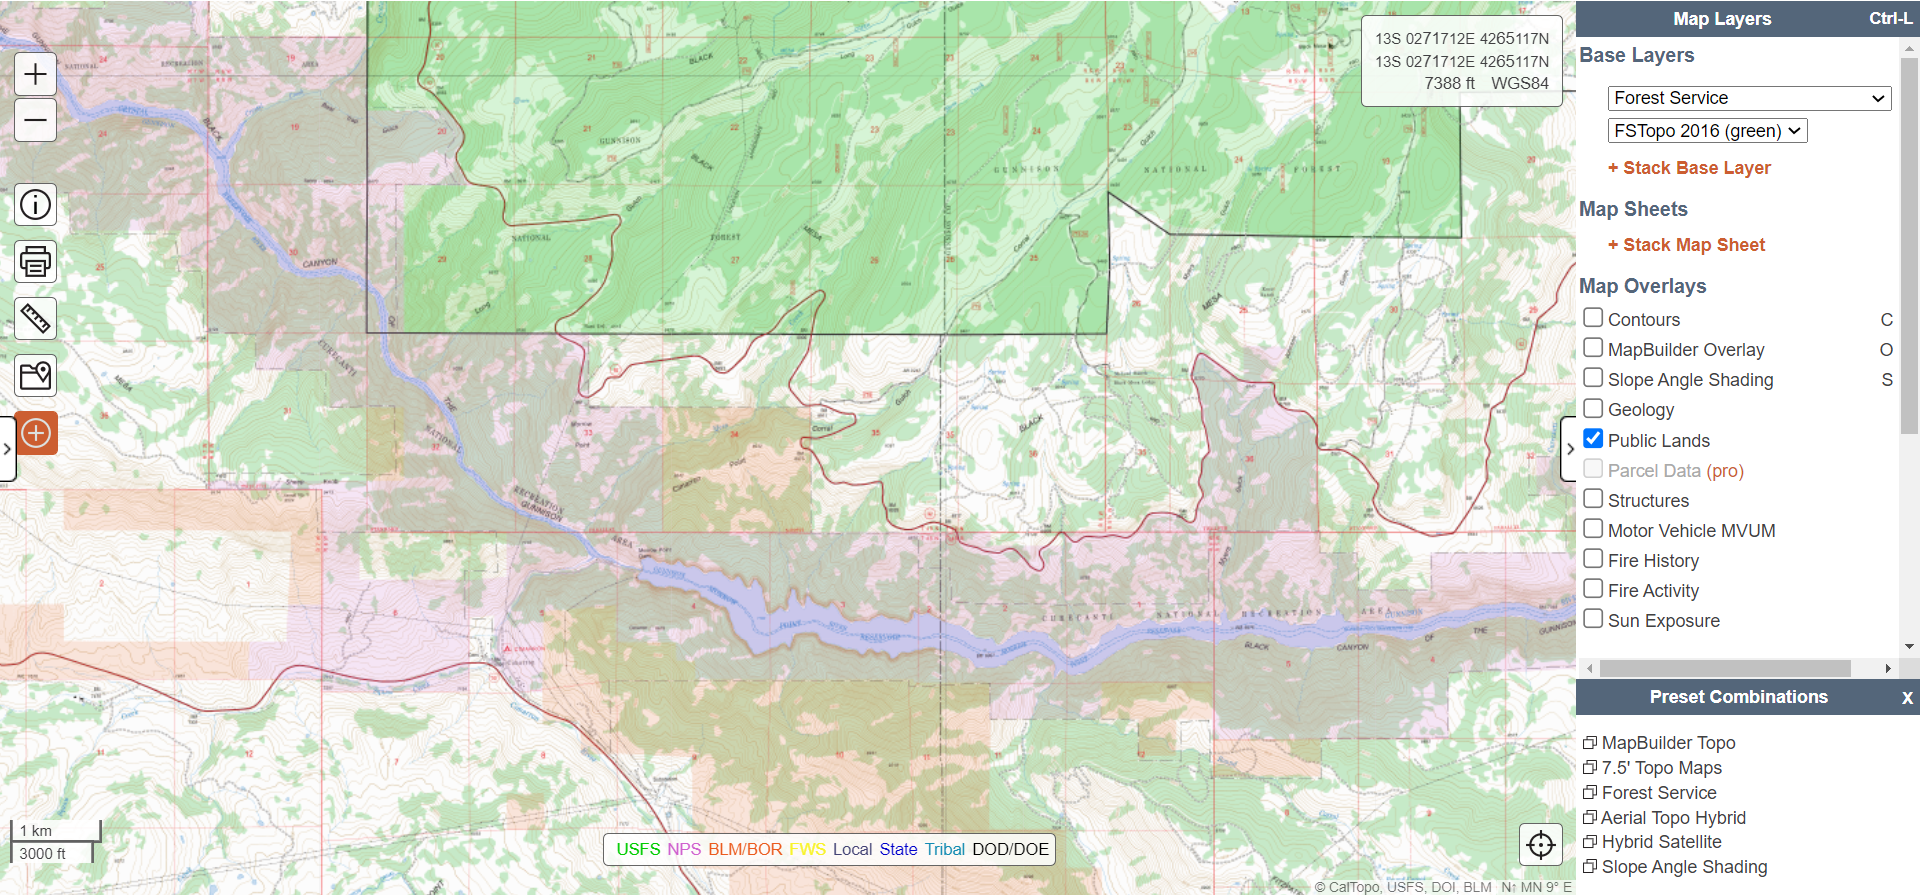
Public Lands
This layer shades your map depending on which land management agency governs a particular area. This layer is beneficial in determining the terms by which you can access and use specific locations.
For example, suppose you wanted to know where you could operate an aerial drone near Black Canyon of the Gunnison. In that case, you could use this map to determine the National Park Service boundary (shaded in purple) where aerial drones are prohibited.
How to Export and Print Your Map With CalTopo

For the last part of this guide, we will introduce CalTopo's print and export tools.
You'll find the print icon 🖨️ just above the measure icon 📏 on the left side of your interface. The export option is located in the map objects window, which you will need to open if you collapsed it earlier.

When you click on the print icon, CalTopo will open a new window for a printing page. Your access to features is somewhat limited with the free account, and for the sake of learning, we'll only cover a few.
Format
You have the option to create a JPEG image, PDF or print a paper map. Each image generated comes with a scale and declination indicator and has its own advantages:
JPEG is a standard image that can easily be copied into a trip itinerary or shared via text message.
PDF creates a shareable link to your map. The free version only allows it to be shared for 1 week.
Order a Paper Map opens a window to The Mountyn Co's website. There you can see a digital copy of your map and choose to print it on traditional or synthetic paper.
Grid Lines
This allows you to add a UTM grid to your printed map. The grid is visible when you generate your map.
Pages
Choose between landscape and portrait. If you're generating a PDF, it allows you to create several pages at once.
Export
Exporting your map as a file allows your route and other features to be imported to your handheld GPS or smartphone applications like GAIA GPS and Avenza Maps. You can also import KML files on Google Earth. This is an excellent way to visualize your route before heading out into the backcountry and create outstanding graphics for a trip itinerary.


For the export option to be available, you'll need to create map objects using the "+Add" tool mentioned above. Once you've made objects and click export, a window like the one pictured above will appear.
Simply select which features you would like to export in the file and click export to download it to your computer. From there, you can import your file to your handheld or other applications, a topic that we'll cover in a future guide.
Have fun out there!
CalTopo's desktop version has the most streamlined and user-friendly mapping interface available for free anywhere on the internet. It is one of the most valuable tools for planning trips and allows you to leave folks at home with a detailed plan. While picking a hike from a menu from an application AllTrails can be easy, there is a novelty to using CalTopo's tools to plan a trek of your own.
Take the time to practice what you've learned, build a route and get out there and hike! Be sure to share this page with others you believe would value the information, and subscribe below to stay up to date when we release new guides.